Basic Animation Workflow in Maya LT
Characters & Creatures 3D models | Categories - Sketchfab
Use Sketchfab to publish, share and embed interactive 3D files. Discover and download thousands of 3D models from games, cultural heritage, architecture, design and more.
Good. Let 's begin!
We gonna walk you through the very basic Animation workflow in Maya LT.
1) First, open Maya LT and import your model

2) To animate a character, we have to rig them, basically we are going to create a skeleton inside our character to control body parts and organize them overtime in a sequence of movements
 |
| Select the entire model then press Space |

Using Quick Rig for character
 |
| Complete rigging |
3) After rigging, we now officially have full control on our character for the animation process
We will apply the Keyframe Animation technique, which can be found here: Keyframe Animation
The concept is pretty similar to creating a GIF image, we capture our character in a sequence of movement following each other.
In Maya LT, this sequence of movement is stored among keyframes. We set keyframe by pressing "S" at specific places in the timeline.
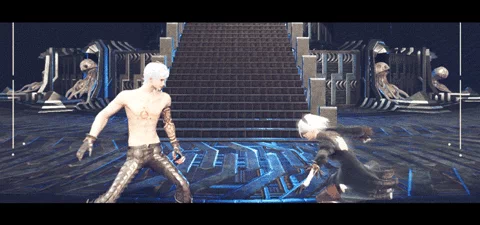
This is a demo on creating a simple character animation:
The concept is pretty similar to creating a GIF image, we capture our character in a sequence of movement following each other.
In Maya LT, this sequence of movement is stored among keyframes. We set keyframe by pressing "S" at specific places in the timeline.
This is a demo on creating a simple character animation:
Overall, this is a first-look walkthrough to create a simple animation for a character. For more advanced concepts and techniques, please refer to:
Animation | Maya LT | Autodesk Knowledge Network
Topics in this section Animation Basics Keyframe Animation Nonlinear Animation in Maya Time Editor Graph Editor Path Animation Animation Layers Animation Reference Maya LT animation provides you with the powerful tools you need to bring the characters and objects in your scenes to life.


Leave a Comment